Spam Filtering
Junk filters use formidable logic and magical incantations to identify the telltale signs of spam. Or, you can train them to identify email you don’t want. It all depends on how your email program implements the junk mail filter.
In Windows Live Mail and Windows Mail, follow these steps to configure automatic junk-mail options:
-
1Get to the place where you set junk email options.
-
In Windows Live Mail, choose Actions→Junk E-Mail→Safety Options.
-
In Windows Mail, choose Tools→Junk E-Mail Options.
A dialog box appears. It’s called Safety Options in Windows Live Mail, and Junk E-Mail Options in Windows Mail.
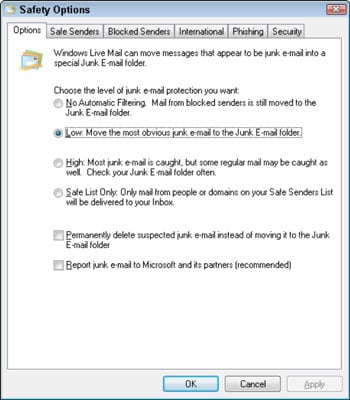
The Options tab is where you make the primary settings. Other tabs are more specific, including information about blocked senders.
-
-
Choose a level for filtering junk mail.
There are four settings, as described onscreen.
-
Click OK.
Some email programs use a mark-as-junk approach to identifying junk email. The idea is that you can train the email program to identify suspect email. Over time, the program instantly recognizes messages you don’t like and automatically transfers them into the Junk mail folder.
-
Junk mail filters aren’t foolproof. Odds are good that a junk email filter will capture some legitimate messages and falsely determine them to be junk.
-
Routinely check the Junk mailbox or mail folder to determine whether real mail is inside. If so, you can remove the messages. Then you may want to tone down the junk mail filter’s aggressiveness or add that sender to the safe senders list.
-
Which is better — using a junk mail filter or training your email program? It’s pretty much a draw. Most of the programs you can train, such as Thunderbird, have options to untrain or reset the training. You also have options to mark a message as “not junk,” which further refines the training.
